
Private Marketplace Deals are invitation only, Advertiser-to-Publisher programmatic purchases of specific and transparent inventory. Before the bid, buyers know the placements, channels and the type of data targeted.
The inventory transaction takes place inside an auction environment but unlike open auctions, the terms of the deal are pre-negotiated between buyer and seller. and A unique identifier called a DEAL ID is generated to identify the campaigns involved in the private deal.
Private Deals allow advertisers to combine the strengths of both programmatic and direct buys: access to premium inventory that matches your targeting criteria and programmatic execution on bidding to set the impression price within the pre-negotiated CPMs.
Most private deals include First-look right to ensure transparency.
With First-look, advertisers can access specific inventory before it becomes available on the open auction and, if negotiated, turn down impressions that do not suit their campaign objectives.
Bucksense can help you to find the best private seals partners and to negotiate the terms of a customized deal that works for both sides.
Conditions of these transactions are stored in our Supported Partners Systems that provide the Deal ID.
Contact your account manager for further details.
How to request a Private MarketPlace
To request a Private MarketPlace from your account manager, you need to provide the following informations:
- Placement Name/ID: this is the main information needed to request a Private Deal. If you are already running campaigns in the Bucksense console, you can get this information from your Acquisition Campaign report, broken down by ‘Placement Name’. If you have not yet launched a campaign, you can find all the available placements and the related IDs in our Media Planner (see here)
- Country: the country in which you want run your PMP campaign
- Exchange Name: the exchange that handles the placement you are looking for
- Connection Type: your connection targeting (3g/wifi)
- CPM: the CPM you are willing to pay for the PMP Deal
- Banner Size: the banner size you want use in your campaign
- Budget: the budget for your PMP deal
With this informations, your account manager will be able to negotiate a deal with the exchange(s).
Setting up a Private MarketPlace in Bucksense console
Once the deal has been approved by the exchange, your account manager will provide you with the DEAL ID.
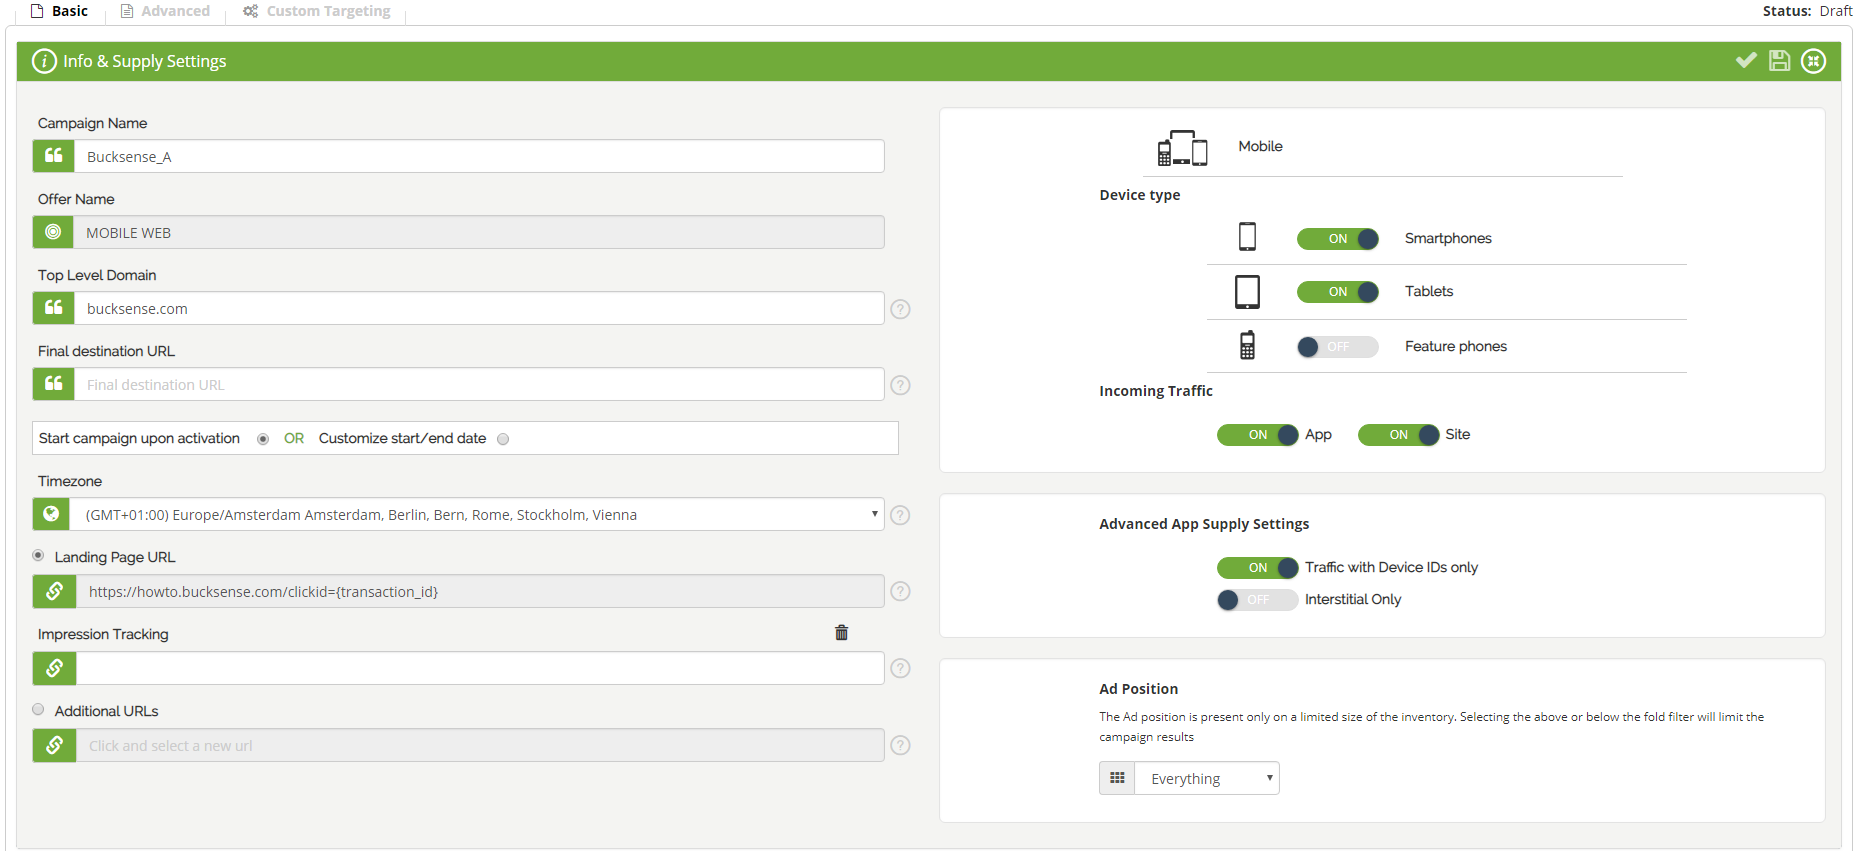
- Click the Campaign Tab and select Add Campaign from the dropdown menu. Name your campaign and select the offer that it belongs to or create a new offer by selecting the advertiser from the drop down menu and by typing the LP url
Next, choose the PMP Campaign Type : Banner, Native, Video or Ad Tag
Select Private Marketplaces as the Auction Type
If you have selected banner creatives for your Campaign Type, you must also select the Type of Inventory: All Open RTB Ad Exchanges or Doubleclick Ad Exchange (Google). - Enter the Top Level Domain (primary level of your site URL ) and the Final Destination Url (the Url of the page the customer will see after all the redirects).
Choose whether to start the campaign upon the activation or customize the start and end date.Choose the campaign’s URL type from one of the following three options:
Landing Page URL: this is the default URL that you previously set up at the offer level
Additional URLs: this is the list of additional URLs (landing pages, web pages, etc), which you previously added at the offer level
A/B testing URL: a subset of URLs, taken from the additional URLs list, that will be rotated in the campaign.Impression tracking field (only available for banner campaigns) allows you to enter an url where you want to be notified every time an impression is delivered and your creative has been viewed by the user.Impression tracking macros (see here) can be added to your impression tracking url to get additional informations.
The macros string will be replaced with a value when the ad is served to the user.Advanced App Supply Settings can be enabled for mobile campaigns:
Traffic with Device IDs only (enabled by default): it allows you to target your mobile campaigns only on the Exchanges that provide inventory with the device ID.
This option is selected by default to ensure you high ad quality standard. Disable it if you want to reach higher volumes of traffic
Interstitial Only: enable this option if you only want interstitial banners running in your campaignThe Ad Position option allows you to set a specific target for the position of your ads.First of all choose one of the 3 following options:Everything: select this option to palce your ads everywhere across the page
Above the fold: select this option in case you want to place your ads on top on a page
Below the fold: choose this option to place your ads at the bottom of a page. The users will need to scroll down the page to view your bannersPlease note that the Ad Position option is only present on limited sizes within the inventory pool. Selecting the above or below the fold filter, will limit the campaign results.
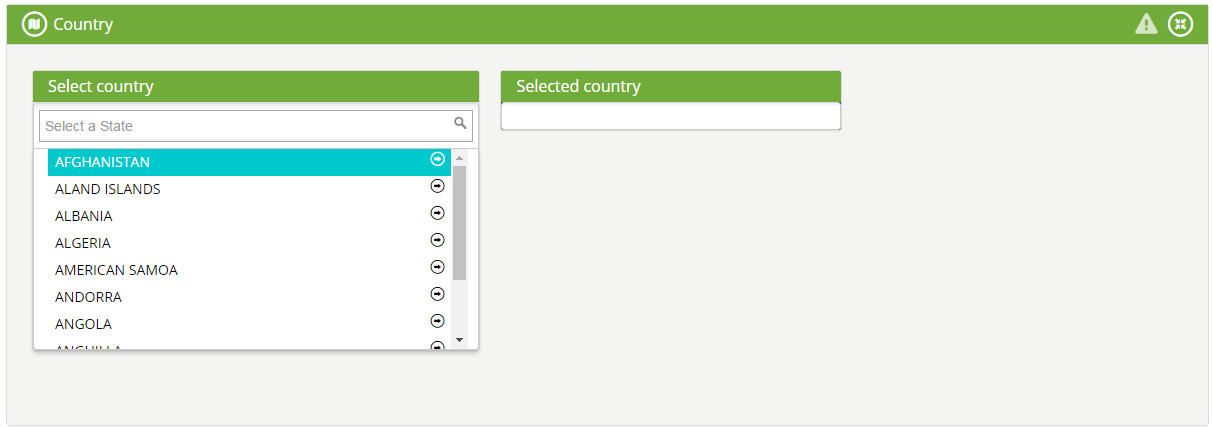
- Click Country and select the country/countries where you want to run your campaign
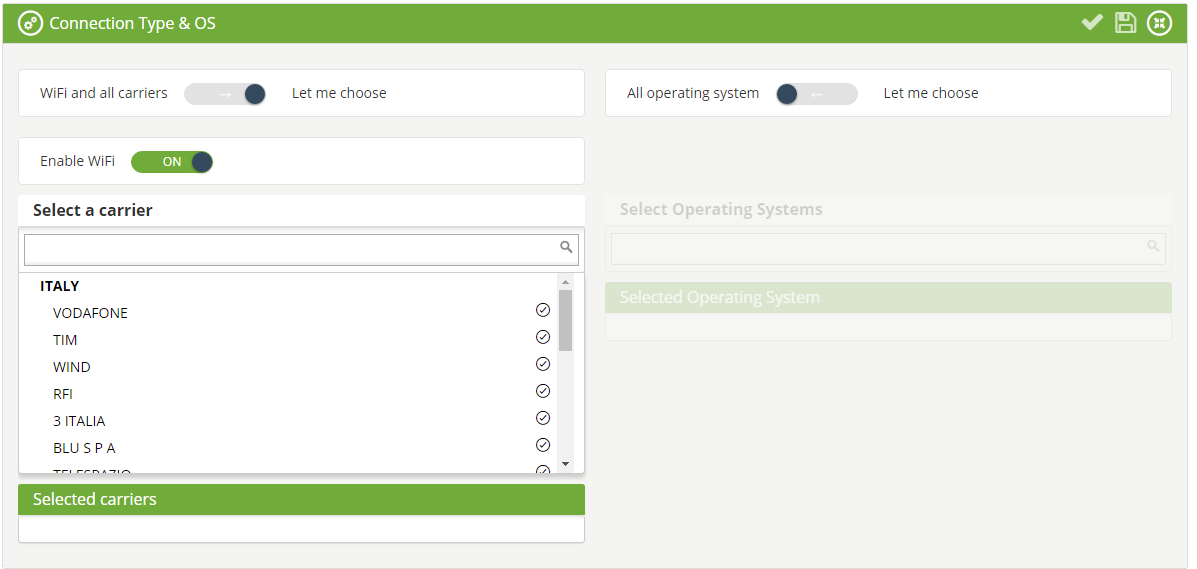
- Click Connection Type & OS and select Let me Choose if you want to pick specific Operating Systems and/or Carriers (for Mobile Campaigns). If you do not wish to receive WiFi traffic, disable this option and select the specific carrier/s.
- Depending on the selected campaign type, you will see the following sections:
– Creative (Banner Campaign Type): drop or select files to upload to your creatives (see here). If you have previously uploaded creatives for this advertiser, you can add them from here
– Ad Units (Native Campaign Type): enter a name, add a small icon and a main image, add a brief title and a description. Then choose a call to Action and a rating (see here)
– Creative Video (Video Campaign Type): enter your Vast Tag Url or past the VAST XML in the appropriate field (see here)
– Ad Tag (Ad Tag Campaign Type): enter the code in the field provided (see here)Click on the Save all button to save your campaign creatives. - Click Budget & Spend Type to set up your: CPM App/Site Target, Budget Type (Capped or Unlimited), the Total Campaign Budget (in case of Capped Budget Type), the Daily Cap and the Pace (Spend as fast as possible or Spend evenly throughout day).
You can also set an Impression Cap and/or a Click Cap (Daily or Total):- Impression Cap: This is the maximum number of Daily/Total ad impressions that can be served.
For example, if you set a Daily impression cap of 20,000 then no more than 20,000 impressions can be served per day.
Minimum value that can be set is 1000. - Click Cap: This defines the maximum number of Daily/Total clicks for your campaign.
For example, if you set a Total click cap of 5000, your campaign will not exceed this number.
Minimum value that can be set is 100.
The campaign will be paused as soon as a cap, for Impression and/or Click, have been delivered (if you set a total cap for both: Impressions and Clicks, the campaign will be paused when either one of the two reaches the total limit).
Please note that if you have set one or more caps (Impression, Click, Budget) at the Offer level, your campaign will be paused as soon as the lowest cap among those set is reached (see more about Offer caps here)
With the information provided by your account manager, select the Exchange from the drop down menu and insert the Deal ID related to your Private Market Place.
Click on to save your Private Marketplace.
If you have multiple Private Deals for the same campaign, you can easily add them by clicking on the Add Private Deal button.
If you want apply Microbidding rules, you have to click on Microbidding Settings button (see here).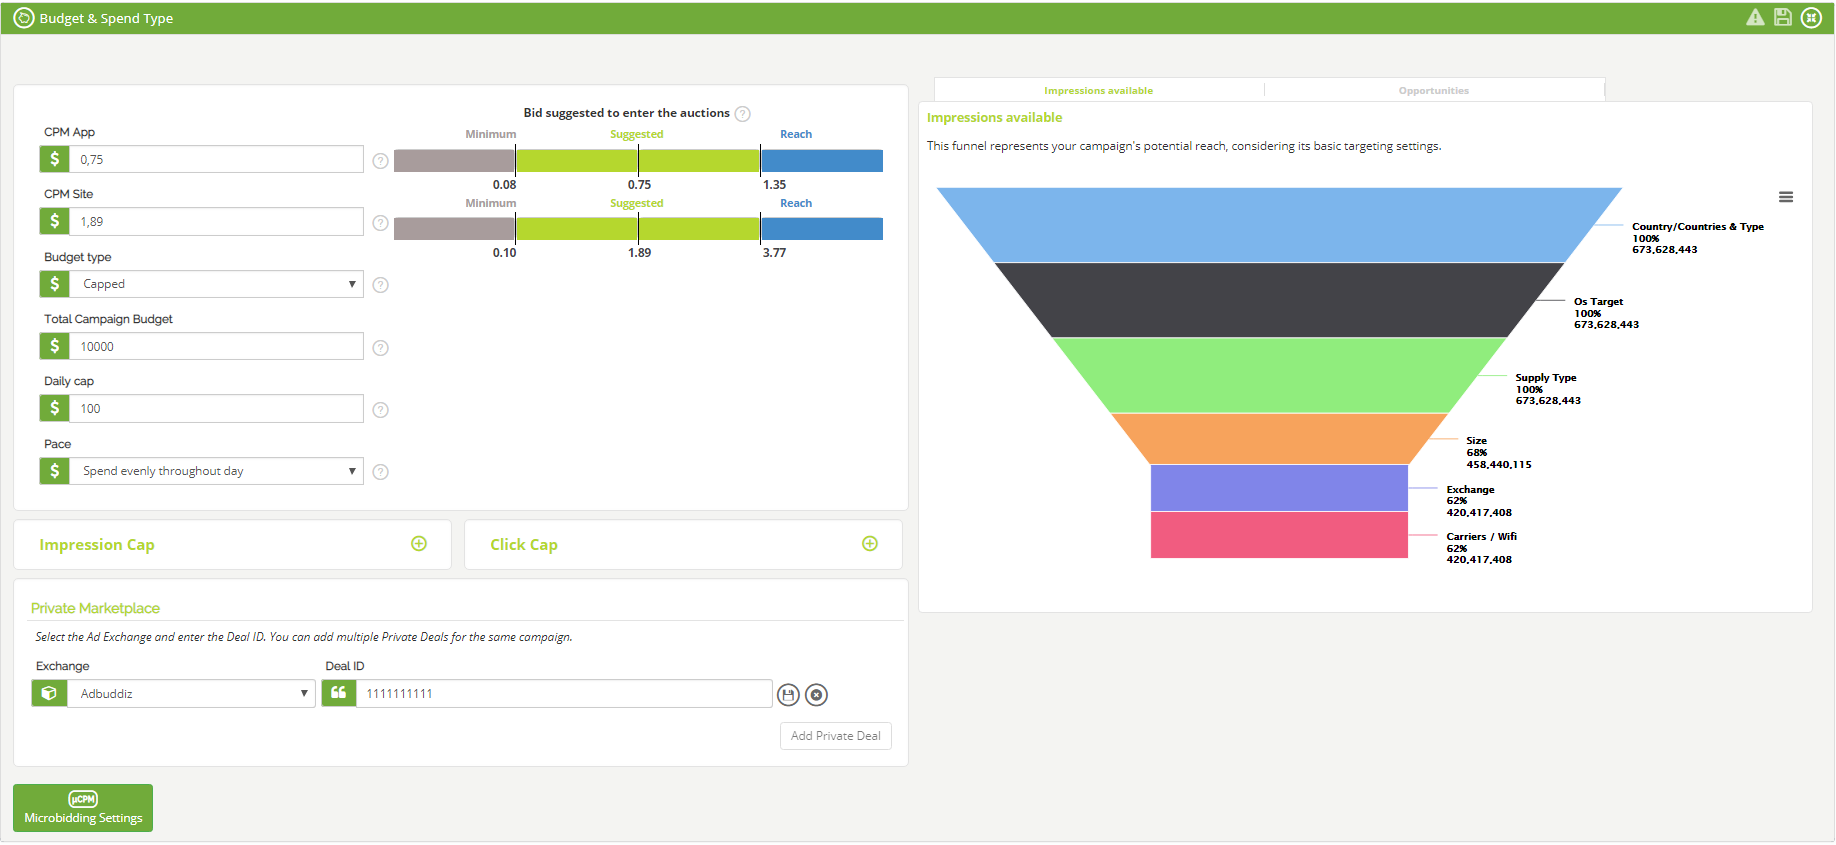
- Impression Cap: This is the maximum number of Daily/Total ad impressions that can be served.
- You are done! Now Click Activate to submit your campaign.